DUH-211/DUH-211S - Features
Dynamic Ultra Micro Hardness Tester
DUH-211/DUH-211S Features
- Evaluation of Hardness and Material Parameters in Accordance with Standards (ISO 14577-1 Annex A)
Measure the behavior of a specimen as an indenter is pressed into it and evaluate the hardness, elastic modulus, and amount of work done during indentation, in compliance with and ISO 14577-1 (instrumented indentation test for hardness) Annex A. - Highly Precise Evaluation of Elastic Modulus
Perform highly precise evaluation of the elastic modulus, using correction based on instrument rigidity and the shape of the intender tip*1. - Low Test Force with Measurement Resolution of 0.196 μN
Control the test force using a high resolution of 0.196 μN. This allows measurement of material strength properties in micro regions and in the outermost surfaces of specimens. - Ultra-Wide Test Force Range of 0.1 to 1,961 mN
Use a wide test range of 0.1 to 1,961 mN for measurement, and test a variety of industrial materials, including rubber, plastics, and ceramics. - High-Precision Measurement of Indentation Depth
No need to measure the actual indentation. Specimen indentation depth can be measured in units of 0.0001 μm for depths up to 10 μm. - Supports a Wide Range of Testing Methods
Record the relationship between the test force and the indentation depth. Test both the unload and load processes. Use the DUH-211S to perform cyclic load-unload tests and step load-unload tests. - Supports Vickers Hardness Test
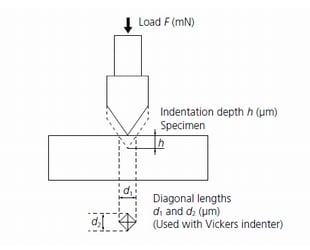
function to measure the length of diagonals is provided as a standard feature. This function allows you to measure the hardness that corresponds only to plastic deformation, Vickers hardness, and Knoop hardness. (A Vickers indenter and Knoop indenter are available as options.) Maximum microscope magnification is 500× (1000× is available as an option)
*1 Indenter tip shape correction is only available for the 115-degree triangular pyramid indenter. Shape correction is not available for other indenters.
Measurement Principle
Electromagnetic force is used to press an indenter (standard type: 115° triangular pyramid) against a specimen. Pressing force is increased at a constant rate, from 0 to the preset test force. Indentation depth is automatically measured as the indenter is pressed against the specimen. This allows dynamic measurement of changes that occur in the specimen's resistance to deformation during the indentation process, and obtains a wide variety of data. During indentation the DUH-211/211S measures dynamic hardness and evaluates the hardness that corresponds to both plastic and elastic deformation. Also, if the indentation size is large enough to be observed with a microscope, hardness can be calculated using just the plastic deformation, by measuring the diagonal length of the indentation.
Expressions for Dynamic Hardness

- 115° triangular pyramid indenter (standard)
DHT115 = 3.8584 × F / h2 - 100° triangular pyramid indenter (option)
DHT100 = 15.018 × F / h2 - Vickers indenter (option)
DHV = 3.8584 × F / h2 - Knoop indenter (option)
DHK = 1.5583 × F / h2
Even though the theoretical unit for these hardness expressions is kgf/mm2, it is normally not used.
Expressions for Martens Hardness (ISO 14577-1 Annex A)
- 115° triangular pyramid indenter (standard)
HM115 = 1000 F / 26.43 × h2 [N/mm2] - Vickers indenter (option)
HMV = 1000 F / 26.43 × h2 [N/mm2]
Hardness Expressions Based on Diagonal Length
1. 115° triangular pyramid indenter (standard)
HT115 = 160.07 × F / d2
2. 100° triangular pyramid indenter (option)
HT100 = 121.53 × F / d2

3. Vickers indenter (option)
HV = 189.10 × F / d2

4. Knoop indenter (option)
HK = 1451.1 × F / d2


